Showing posts with label craft ideas. Show all posts

2.24.2015

Preschool Art Lessons


In the fall, a homeschooling friend of mine began talking about doing a mini-art lesson each week with her 4 year old daughter, so we began doing just a little crafty/art time together with Ariana. 

It's evolved a little this semester, and we added another little student. I love helping little ones begin learning about simple art basics, and I thought I'd share my plans here for anyone else who'd like to play along at home! 

Last semester, we experimented a lot with color theory and mediums. We also did a lot of seasonal play! 

I got this book before Christmas and decided that during the spring semester, I would loosely follow it and we would do some veryyyyyy simple studies of the Masters. 

Last week (our first week), we talked about the colors in the rainbow and experimented with the different ways different media looks: watercolor, different tipped markers, liquid water color, acrylic paint, neocolors, and oil pastels. 

The girls made a banner that they took home, a different color & medium represented on each piece of the banner. It was cute! 

This week, we talked about the Renaissance and specifically, Leonardo Da Vinci! Before we got into all of that, though, we looked in the mirror and tried to draw our different expressions (especially paying attention to how our eyes, eyebrows, and mouth looked during each one). 


Then we watched this little video about Leonardo Da Vinci. 

After hearing about the Mona Lisa, we had to try our hands at adding hair and clothing! (This activity would be really fun to see how they did at different ages.) 


Then we worked on self portraits, using this printable. 

Because little ones often tend to rush through an activity like this, I had them only do what I instructed them for each step instead of just free styling it. They first had to go look in the mirror and I prompted them with questions like "What shape are your eyes? Are they football shaped or circles? What color are they?" and then they would come back and just draw their eyes... and so on and so forth, so that they really took the time to look at their faces and try to draw details. I loved their results! 


 I'll continue to share our journey each week! 


1.25.2015

Make Stuff - a women's craft night at our church

For three years or so, I've had a dream to have a place for women to come together at our church and find some solace in other crafty ladies. In past experiences for myself, going to scrapbooking crops and retreat weekends, there have been deep relationships formed over the bits of paper and sticky glue. There is something to be found when women come together to create something with their hands, and find that their hearts bind together.

For three years, the timing has not been right for me for various reasons, and then all of a sudden, God opened the door and things aligned and instead of me pushing for something I wanted, I got swept into what I believe is a small part of God's plan for the hunger of the women in our church and community for deeper relationships. (Yes. That's a super long run on sentence. Sorry about that!)


For now, it is just once a month. I already saw small glimpses of how God can help us to walk alongside each other with the raw bits and pieces of artwork, mending, paint splatters, twines of yarn, hopes, and stories forming in our hands and hearts. 


It is so lovely and refreshing to share this time with likeminded women. I can't wait until next month! We do have plans for some of the evenings to be more structured (we have some projects in mind to work on together as a large group), but we will have them mixed in sporadically with the more open ended nights too. It was good for my heart, not because I was crafting and not because I was with other women, but because in that simple setting, the Gospel was whispered to me. 

11.26.2013

Thankful Buckets


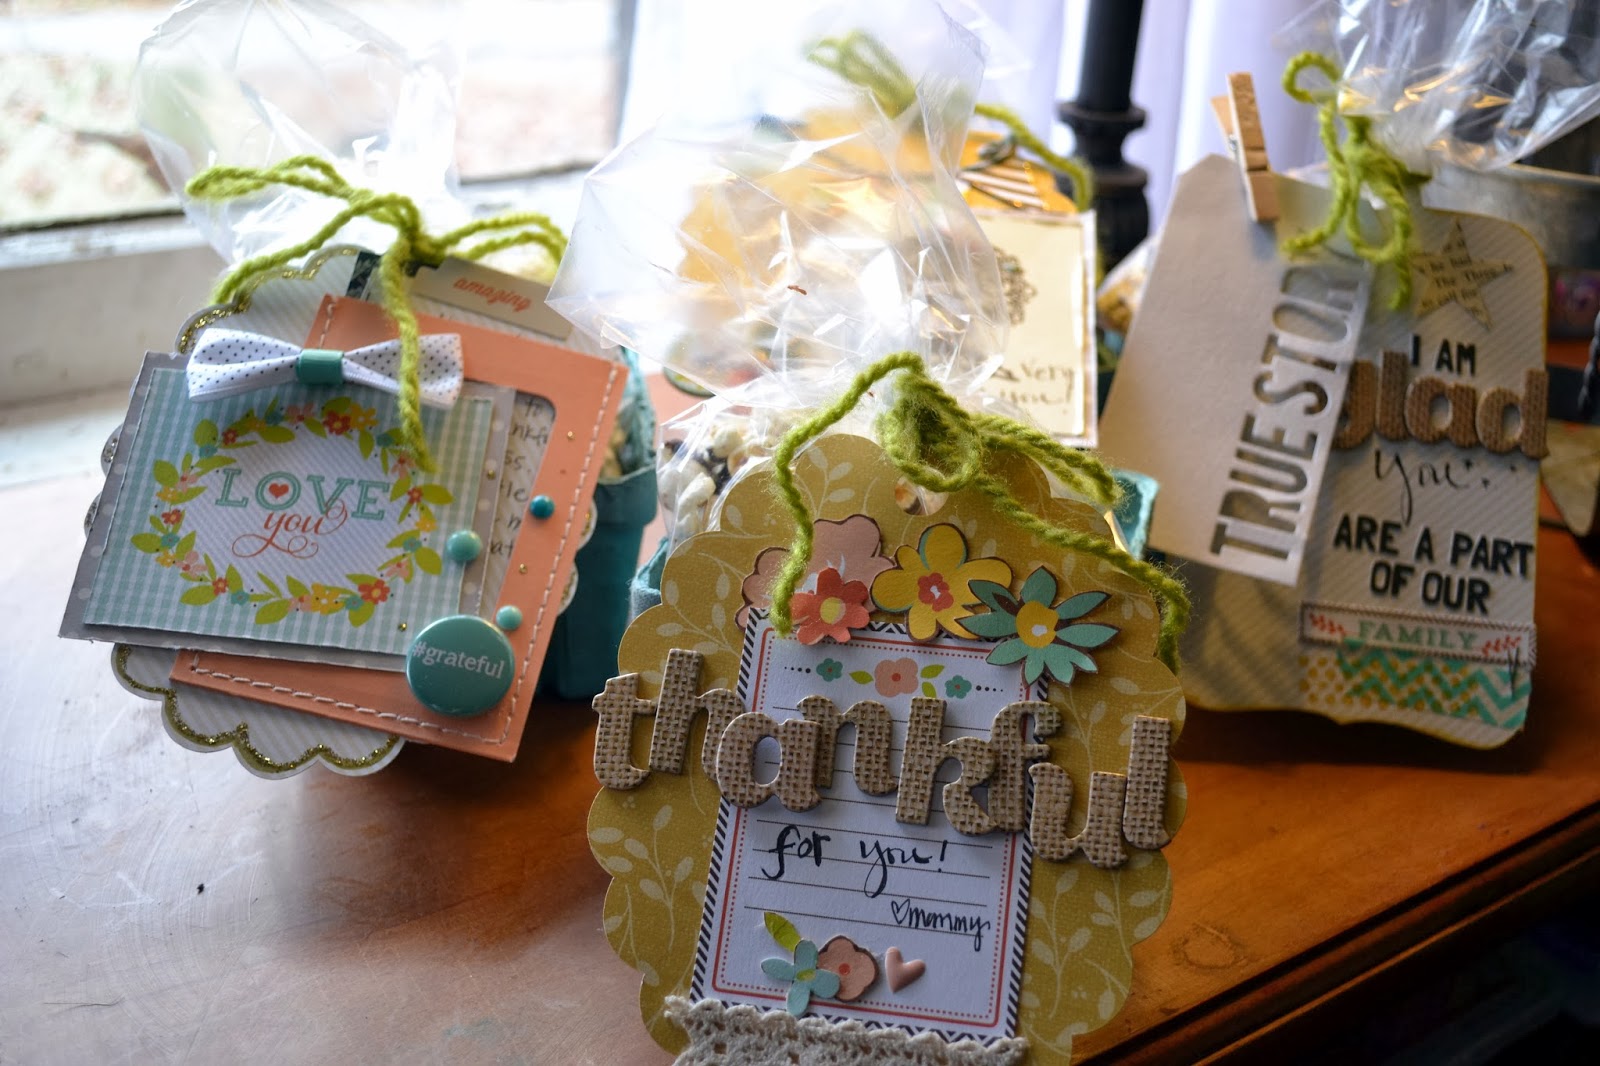
A friend of mine inspired me the other day with some little goodies she'd left on her bed for her kiddos to surprise them when they got home from school. Most days, I get home at the same time as my kids, so I don't get to do little surprises like that... but this week, I am off for Thanksgiving and was excited to make these little "thankful" prizes for my kids. 


They are very simple, really... just some little strawberry baskets I purchased on etsy filled with baggies of our favorite chocolate drizzled popcorn for an afternoon snack. I added tags made with the NoelMignon Gather Together and Union Square kits. 


Just like any other mom, I find myself getting into a rut with fussing and reminding and nagging and everything else with my kids... and I want to be more mindful of telling them of the good they are bringing to our home. That is the point of these little tags... so that they know, regardless of them leaving their shoes and backpacks on the middle of the dining room floor for the bazillionth time, that I am THANKFUL they are in our family... thankful that they are ours. 


I hope they love them... and that they feel that they are loved! 


6.03.2013

Plastic Little Tikes Easel Makeover!

Ariana asked me a couple of weeks ago if she could be "a real painted with one of those standing up things," so when we spotted this little plastic easel at a yard sale for $1, we snatched it up. 

I wasn't thrilled with the primary colors and wondered if I could just spray paint it... and yes. 
Yes I could! 


I started off with a spray paint primer made for plastic.


I grabbed two colors from my paint collection- a rick turquoise and a happy watermelon. 


It was a pretty fast project and we love the results. It looks super cute on my porch and way better than the primary colors! (The watermelon reads more red in these photos than it actually is.) 


Super easy and fun project! And now Ariana can be a "real artist." ;)

4.15.2013

Thoughts on Room Sharing with Three Sisters

I've mentioned our home here a time or two ;) - we live in an old Southern house, built in 1924. I love its screened in front porch, the tongue-in-groove walls, the big old wooden doors. It's got an interesting layout... but what I don't particular love is the way the rooms are portioned off. I am grateful for our home. And I believe that small homes create close families. 

Right?

Sometimes teaching that philosophy doesn't go over so well with  my kiddos. Especially my three girlies who share a room. As we discover in the world pretty quickly, not everyone is like us! My three girls are no exception. I have a super tidy, neat, minimalist daughter, who likes a place for everything and everything in its place. I have a magpie daughter, who gathers up tiny bits of paper and everything is sentimental to her. And I have a silly three year old, whose personality lends itself to chattering into the night and snuggling up close to whoever is her favorite at the moment. 


Providing space for all of them to flourish and for them to learn to get along and respect each other is challenging, to say the least. I'm a "researcher" by nature (I get it from my sweet Grams)- I like to look up how other people have done things, read about different strategies, and learn from others' trials and errors. I have discovered that in looking up info on the WWW about siblings sharing rooms, most of what I can find is either super functional or super extravagant. There's not much middle man out there.

So this post is for you, whoever you might be, looking for cute but affordable rooms for little girls that are sharing the space. :) You're not alone! 

This is the girls' closet. It's the one room in the house with a big closet. The right side of it has a closet bar hanging from the other bar, so we have two rows of clothes: one for my big girl and one for the two little girls. We also have hanging shoe storage on that side. The left side has a three drawer plastic cart with pjs in it, and a basket of socks on the top. Storage for sleeping bags, swim stuff, and other odds and ends is on the left. On the top shelf, I have a rubbermaid bin for each girl with clothes for the next season in it. 


The shelves are backed with wrapping paper. Each girl has her own shelf, and the two big girls also have a bin on the very bottom. Ariana (the littlest) doesn't really care so much about that yet, so all of her stuff is consolidated to one shelf. 


This is our real life, not magazine-worthy sleep situation at the moment. I can't tell you how many times the girls have traded spots, so who knows how long this current arrangement will last! The top bunk is Emerson's (my oldest). She gets really frustrated when her bed gets messy, so I suggested she move up top so no one would mess with her bed. It's working for now! The butterflies were cut with my Silhouette machine. 

The bottom bunk is currently being shared (SHARED!!) by the two little girls. If you'll notice, there's actually a trundle bed below, which is technically Ariana's bed. But at the moment, they wanted to share a bunk and since they are so little, it's fine by me. Sabby is my "magpie" and likes to collect things, so her bed is always full of stuffed animals and notebooks and hidden snacks (that I have to confiscate). We have white twinkle lights woven through the slats above the bed and it makes story time at night quite dreamy. We added some glow in the dark stars this weekend as well which the girlies love when the lights go out. 


The girls share this dresser (that is in desperate need for paint and a knob upgrade... when I have some "spare" time- haha!). The bottom drawer is Sabby's, the middle is Ariana's, and Emerson opted for the baskets and mini suitcase for hers. 

It works for us right now. We keep toys in the playroom and the girls feel a sense of ownership of their room without being overwhelmed. 

And I hope that it will help draw them closer. My prayer is that my girls love each other for their differences, and that I can help their bonds grow strong. 


2.15.2013

Valentine's Gift


I think it must be every scrapbooker's curse to at least once have something spill all over one of their projects. I had a lovely layout all created with Julie's awesome sketch, but as luck would have it, my trusty cup of water was toppled over by one of my smaller companions all over my desk, and the main victim was my layout. :( Wahhh wahh! I'm in the process of re-creating it, and I'll be posting it later this weekend.

In the meantime, I do just happen to have another project I can show you today (thank goodness!). A friend of mine asked if I could make a gift for her to give to her husband for Valentine's day, using old photos of them. I was so excited to be able to help her out! 

She gave me several school photographs to choose from, and I converted them to black & white to give them a more "timeless" feel (and so I wouldn't have to work to compete with the colors).

I covered a canvas in text wrapping paper I picked up in the Target dollar spot a while back, and then added a layer of burlap on top of that. A cardstock frame cut out with my Silhouette machine added an elegant contrast to the rugged edges of the burlap. 


The burlap heart from the Lasting Love kit made a fun focal point, and an accent cut from corrugated cardboard added the right texture to complete the simple design.

I used cool office clips attached with two brads (and some hot glue for security) to clip  up mini collages made from papers & labels from the Lasting Love kit and the photos on top. I wanted to keep the whole piece simple, shabby, and elegant, and I think I accomplished it. And now I want to make myself a piece just like it! Ha! 


2.12.2013

Inexpensive Owl Valentine Bags for Preschoolers


I teach a three year olds class at the Mom's Day Out at our church, and I was trying to come up with an expensive, simple project the kids could do for their "mailboxes" for Valentines day. After looking on Pinterest, everything that I found was either too hard to try to do with 12 preschoolers, or would end up costing too much.

I stumbled across this project from Oriental Trading Company, but didn't have enough time to order the pieces... but it DID give me an idea.

Enter my collection of scrapbook punches and two-for-a-dollar red gift bags from the Dollar Tree.

I helped the kids add on glue and they stuck the pieces on. My scalloped circle punches and pennant banner punches were perfect for the eyes and ears, and I freehanded the wings. A sparkly heart foamie sticker made a great nose! 


I love seeing all the little wonky eyes. They make me smile. We are really excited to use our bags on Thursday! 


2.08.2013

You Are Loved


Have you joined Vine yet? It's a new app for your phone that helps you create simple six second videos. It's like Instagram but with little videos. It's so fun! Leslie Ashe & myself are already on there... (you can find me as Mrs_Caulfield.) It's a fun way to show snippets of a project you are working on too- here's one I did this week of this project:

And below is the final project, made with the Lasting Love & Soda Shoppe kits (they combine well together!).


The little banners in the Lasting Love kit are so cute draped across a frame.


The words are painted with mist and a fine tipped paintbrush. I love the way the letters are different gradients. 


This little Valentine in a frame will be going to a teenage friend of mine. I think it's such an important age to be reminded that regardless of who is taking you out (or not taking you out!) on Valentine's Day, you are loved. 


1.12.2013

Subway Art and Bathroom Painting

I've been in project mode around the house lately. Reorganizing, decluttering... making the hosue "breathable" again.

I found a great, already-wrapped-in-burlap-and-framed cork board at the thrift store last weekend. I'd been planning on doing something like this anyways, so it was such a score. It's perfect for my necklace collection! I also got a paper towel holder for my bracelets, and moved all my jewelry from my bathroom to my bedroom. I love how it adds some functional decor to our room.


I also decided on a whim to paint the bathroom. It's never been painted and always just kind of been "blah." Since there are 6 of us and one bathroom, it definitely needed un-blahing! 

Painting a room with littles running about means stopping often, washing clothes that got paint on them, giving snacks, stopping for hugs, and imperfect paint jobs. I'm ok with that. I figure painted imperfectly is better than unpainted ugly. 


 I added a candle in a sparkly jar on top of the shelving unit after I took this pic for a final touch. 


This mirror was gold and has a hidden medicine cabinet behind it. It had already gotten paint on it from the previous owner so it was particularly glamorous. I like the white shabby look much better! 

I created some new artwork for the bathroom with the NoelMignon Sweet Shoppe kit (still available!


The subway art is inspired by this one but I made a few of my own changes to it to fit our family better. If you'd like a copy of mine, let me know and I'll email it to you! :)


LinkWithin

Blog Widget by LinkWithin